The first frost hadn’t even landed when the rosemary gave up. One week it was a sturdy green fountain in its terracotta pot by the back door; the next it smelt faintly of swamp and the stems snapped like damp cardboard. The compost was cold, black and sour, even though you swear you hadn’t over‑watered. The pot itself left a dark ring on the paving when you dragged it aside, like it had been sitting in a puddle for weeks.
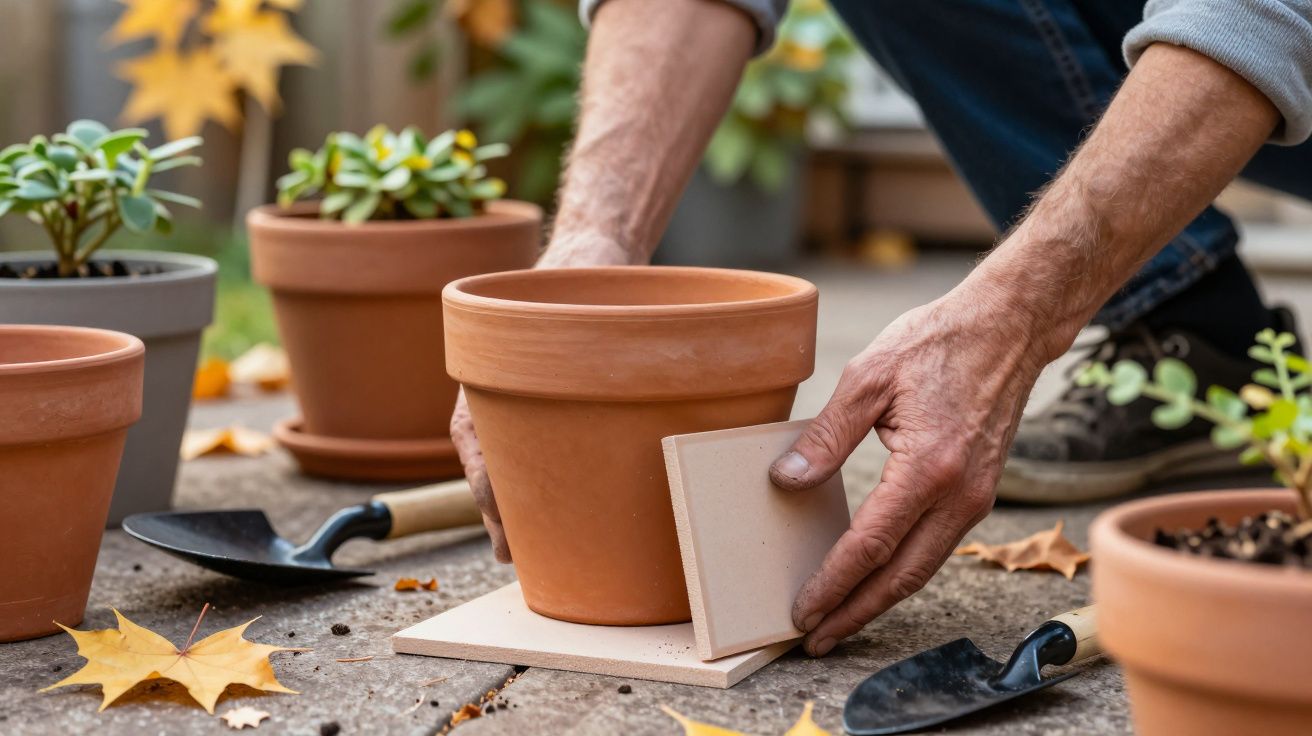
Across the fence, your neighbour does something quietly different. Before winter, she walks the patio with a stack of old floor tiles under her arm. One by one, she levers up the terracotta pots and slips a tile underneath each, so they sit just off the slab. It looks almost superstitious, until you notice that her pots come through winter with dry rims, bright lichen, and plants that actually wake up in spring instead of disappearing into slime.
The trick isn’t magic drainage gravel or expensive “frost‑proof” pots. It’s a gap you can barely see – and it’s enough to stop the slow, deadly creep of root rot.
The quiet physics under a wobbly pot
A terracotta pot pressed flat against a patio or balcony is like a sink plug pushed firmly into place. The drainage hole might be there, but once it’s sealed to a smooth slab or a saturated saucer, water has only one direction to go: nowhere. Each watering, each spell of rain, adds another thin layer of moisture that cannot fully escape.
Terracotta makes it worse and better at the same time. The clay is porous, so it absorbs water into its walls like a sponge. In summer, that can help cool roots as the moisture evaporates. In winter, especially on a cold, non‑porous surface such as concrete, stone or composite decking, the pot stays clammy. The base sits in a film of water, the drainage hole acts more like a wick than an outlet, and the compost around the roots never quite exhales.
Plant roots need oxygen as much as they need water. In a pot that stays constantly saturated, the air gaps between particles of compost fill with water and stay filled. That low‑oxygen, always‑damp environment is exactly what root‑rotting fungi such as Phytophthora and Pythium are waiting for. They don’t arrive as a dramatic attack; they creep in as fine, brown lesions, then the roots slough off and the plant above suddenly collapses.
Lift the pot even a centimetre and the physics changes. That thin, hard surface – a spare ceramic tile, a piece of slate, even a brick – breaks the seal under the drainage hole. Water can leave the pot rather than clinging underneath it by capillary action. Air can move up through the base, helping the compost to dry between soakings. The pot might rock very slightly if you nudge it, but below the surface the root zone is breathing again.
There’s a second benefit most people forget: a raised pot is less likely to crack in a hard freeze. When terracotta is saturated, the water inside its pores expands as it freezes, forcing the clay apart and causing those familiar flakes and splits. By keeping the base drier, that simple tile reduces the amount of water locked into the terracotta itself, so it survives more winters before it starts spalling and crumbling.
How to do it (and what to avoid)
You don’t need a designer system of pot feet to keep roots safe, helpful as they can be. One steady, weather‑proof tile under each terracotta pot will do the job if you place it with a little care.
Start with the surface. Sweep the area where the pot will sit, getting rid of moss, leaves and the thin slime that builds up on shady paving. You want the tile to sit flat and firm, not rocking on a pebble. A glazed or unglazed ceramic floor tile, a piece of quarry tile, or a chunk of slate all work well; avoid anything soft that will soak up water and stay spongy, like untreated timber.
Then:
- Choose the right size. The tile should be at least as wide as the pot base, ideally slightly wider, but not so huge that water collects in a lake around it. For very large pots, two tiles side by side are often better than one precarious perch.
- Lift, don’t drag. Tilt the pot gently towards you, slip the tile underneath with your free hand, and lower the pot onto it. Dragging a heavy, wet pot across a tile can chip both.
- Check the drainage hole. Make sure the central drainage hole sits entirely over the tile, not half on the patio, half on the tile – that creates new low spots where water can pool. If your pot has several small holes, they just need clear space beneath, not a perfect line‑up.
- Test the wobble. A tiny bit of movement is fine. If the pot rocks alarmingly, adjust with a folded bit of old rubber mat or a shard of broken tile as a shim, but don’t block the drainage hole.
- Water, then watch. On the next wet day, take a look. You should see a slightly drier ring around the pot base, and if you slide a finger under one edge you’ll feel air, not a seal of mud and algae.
Common missteps? Parking pots in deep saucers “to protect the patio” is high on the list. In winter, those saucers become permanent ponds, and the pot behaves like a plugged bathtub. If you must use a saucer under a terracotta pot, choose a shallow one and empty it religiously in wet spells. Let’s be honest: almost nobody does that every day in February.
Another trap is stacking multiple tiles or bricks in an attempt to make a pot look taller. If the pile is unstable, the pot leans, the compost shifts, and you get both poor drainage and a wind hazard. Keep it simple and solid: one tile, firmly on the ground, doing one quiet job.
Small winter habits that keep roots alive
The tile trick works best as part of a gentle winter routine, not as a one‑off rescue when a plant is already collapsing. Think of late autumn as the time you “tuck in” your pots: you clear dead leaves, ease off on feeding, and give each terracotta pot something to stand on that isn’t bare, saturated paving.
Walk your space-balcony, steps, patio, allotment-on a dry afternoon before the real cold comes. Note which pots are directly on concrete or stone, especially those with thirsty evergreens like rosemary, bay, or small conifers. These are classic victims of winter root rot: they like consistent moisture, but they hate sitting with their feet in a cold bath.
Lift those pots onto tiles or pot feet, and, where possible, group them. A cluster of raised pots loses less heat and dries more evenly than a lone pot on an exposed corner. Back walls and sheltered spots reduce the amount of rain that drives directly into pots, so you can control watering by hand rather than relying on winter’s erratic downpours.
You don’t need to water terracotta pots as often in winter, but you also shouldn’t banish the watering can completely. The goal is a rhythm of moist‑then‑almost‑dry, not a constant bog. Stick a finger into the compost up to the second knuckle; if it feels cold and wet, wait. If it’s barely damp and the pot feels strangely light when you lift it, give it a slow, modest soak and let the tile do the rest.
“I tell new gardeners: don’t fight the rain, just give it somewhere to go,” says Hannah, who manages a small city courtyard full of pots that have seen a decade of British winters.
- Use: a solid, weather‑proof tile, swept paving, a quick finger test of compost.
- Avoid: deep saucers full of water, soft wooden plinths, teetering stacks of bricks.
- Best for: terracotta pots on patios, balconies, roof terraces and concrete yards.
- Bonus: longer‑lived pots, fewer cracks, less green slime on your slabs.
| Point clé | Detail | Why it matters |
|---|---|---|
| Create a gap | Lift terracotta pots 1–2 cm off hard surfaces with a tile or feet | Breaks the seal under the drainage hole, so water can escape |
| Keep the base drier | Avoid deep saucers and soggy pads under pots | Reduces waterlogging and cuts the risk of deadly root rot |
| Protect the pot itself | Raise and rotate pots before hard frosts | Less saturation in the clay means fewer cracks and flakes |
FAQ:
- Can I use anything instead of a tile? Yes. Purpose‑made pot feet, bits of brick, slate, or small concrete blocks all work as long as they’re stable, weather‑proof and don’t block the drainage hole. Tiles are simply cheap, flat and easy to find.
- Does this only matter for terracotta? Terracotta is most vulnerable because it’s porous and often sits on patios, but plastic and glazed ceramic pots can also suffer root rot if their drainage holes are sealed to a hard surface. Giving any pot a small gap underneath is helpful.
- If I raise my pots, can I water as much as I like? No. Raising pots improves drainage and air flow, but it doesn’t make plants immune to over‑watering. In winter, always check the compost before you water and aim for “slightly moist” rather than wet.
- Will a tile damage my patio or balcony? A flat ceramic or stone tile spreads the weight of the pot and usually protects the surface beneath from staining and cracking. If you’re worried about scratching delicate decking, add a thin rubber pad under the tile, not under the pot.
- My pot already has root rot – will a tile fix it? A tile can improve conditions, but it won’t reverse severe root damage. Gently tip the plant out, trim away brown, mushy roots, repot into fresh, free‑draining compost, and then raise the pot on a tile to prevent the problem returning.


Comments
No comments yet. Be the first to comment!
Leave a Comment